Tracheostomies: The Complete Guide — Second Edition
Tracheostomies:
The Complete Guide
— Second Edition —
Chapter 1 — Normal Functional Anatomy of the Airway and Selected Disorders

Chapter 1 reviews the functional anatomy of the upper airway, and provides detailed mechanism of airway protection, swallowing, coughing, and speech. The relevance of their coordinated function is highlighted by selected common disorders encountered with tracheostomies.
Figure: Anatomy of the Pharynx and Larynx
©Linda L. Morris and M. Sherif Afifi. All rights reserved.
— Chapter 1 —
Normal Functional Anatomy of the Airway and Selected Disorders
Chapter 1 reviews the functional anatomy of the upper airway, and provides detailed mechanism of airway protection, swallowing, coughing, and speech. The relevance of their coordinated function is highlighted by selected common disorders encountered with tracheostomies.
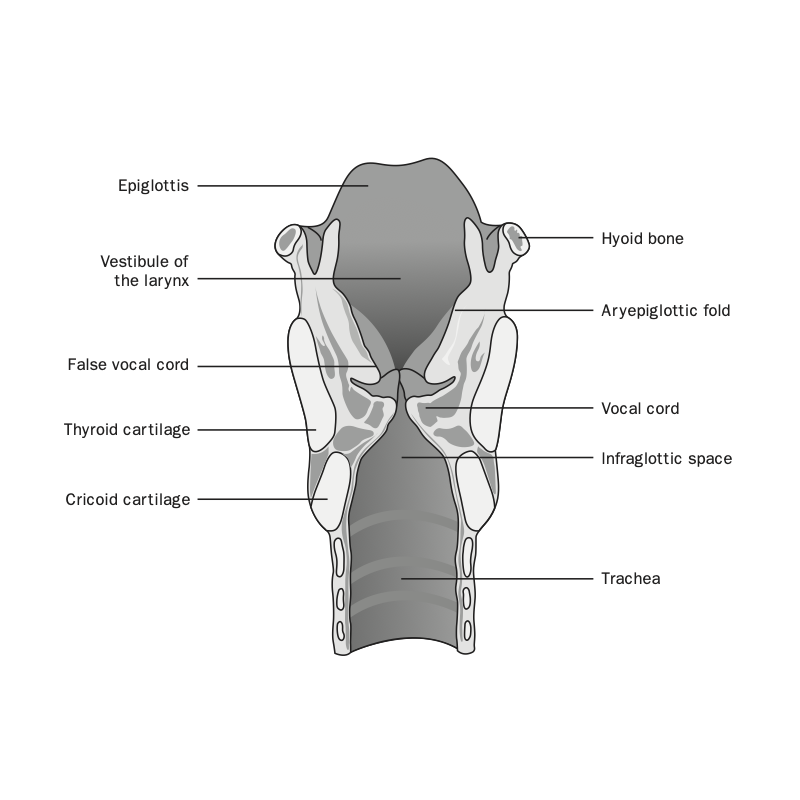 Figure: Anatomy of the Pharynx and Larynx
©Linda L. Morris and M. Sherif Afifi. All rights reserved.
Chapter 2 — Tracheotomy Procedure

Chapter 2 details surgical approach for tracheotomy, including open and percutaneous techniques, with illustrations and bronchoscopic photos. An inclusive list of preoperative preparation, anesthetic management, as well as intraoperative and postoperative pitfalls is included.
Figure: Position & Landmarks — Surgical tracheotomy preparation. A) Patient positioning with roll under shoulders. B) Surface landmarks showing the thyroid, cricoid, intended location of the skin incision, and anterior border of the sternocleidomastoid muscle.
©Linda L. Morris and M. Sherif Afifi. All rights reserved.
— Chapter 2 —
Tracheotomy Procedure
Chapter 2 details surgical approach for tracheotomy, including open and percutaneous techniques, with illustrations and bronchoscopic photos. An inclusive list of preoperative preparation, anesthetic management, as well as intraoperative and postoperative pitfalls is included.
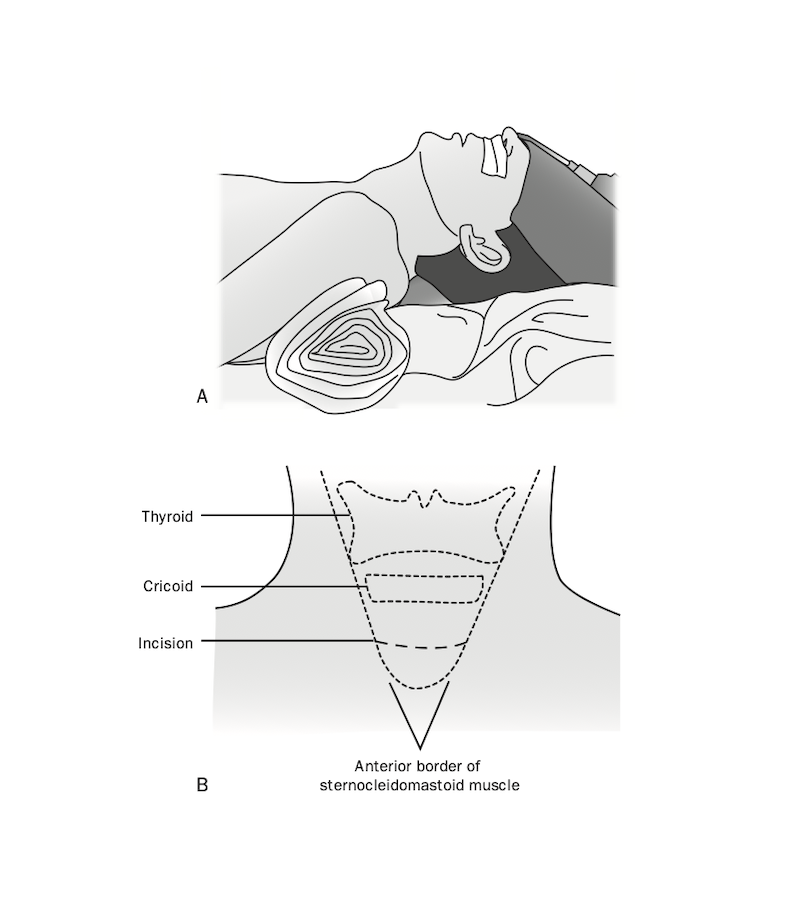 Figure: Position & Landmarks — Surgical tracheotomy preparation. A) Patient positioning with roll under shoulders. B) Surface landmarks showing the thyroid, cricoid, intended location of the skin incision, and anterior border of the sternocleidomastoid muscle.
©Linda L. Morris and M. Sherif Afifi. All rights reserved.
Chapter 3 — Types of Tracheostomy Tubes & Related Appliances

Chapter 3 discusses the different types of tracheostomy tubes, including tube structure, unique features, indications, and use. An exhaustive array of figures and photos crisply detail structural features of dual and single cannula, cuffed and uncuffed tubes, as well as special use tubes such as metal, extra-length, and fenestrated tubes.
Figure: Parts of a tracheostomy tube
©Linda L. Morris and M. Sherif Afifi. All rights reserved.
— Chapter 3 —
Types of Tracheostomy Tubes & Related Appliances
Chapter 3 discusses the different types of tracheostomy tubes, including tube structure, unique features, indications, and use. An exhaustive array of figures and photos crisply detail structural features of dual and single cannula, cuffed and uncuffed tubes, as well as special use tubes such as metal, extra-length, and fenestrated tubes.
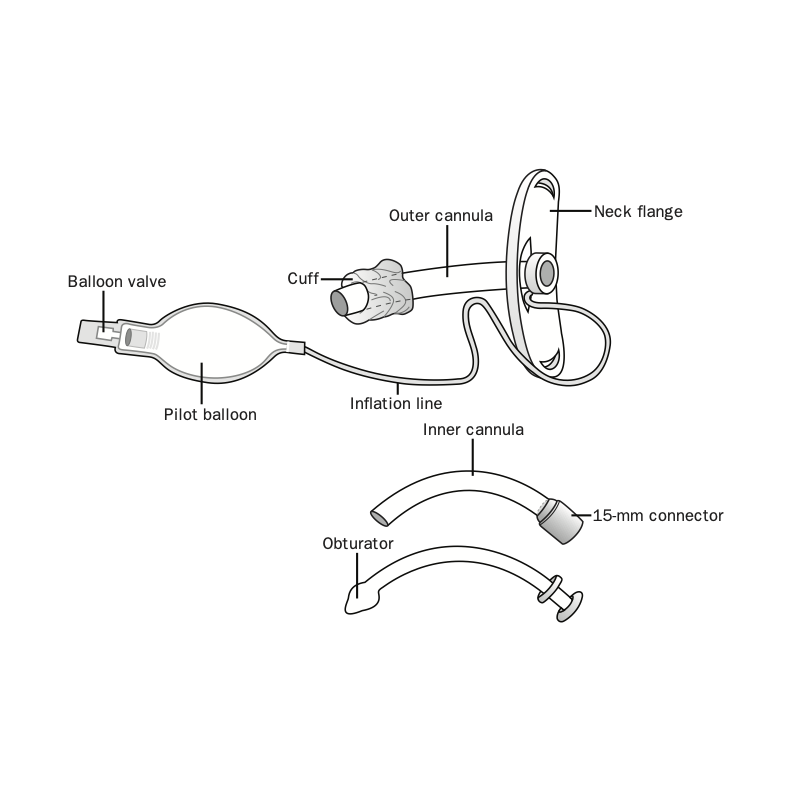 Figure: Parts of a tracheostomy tube.
©Linda L. Morris and M. Sherif Afifi. All rights reserved.
Chapter 4 — Fitting and Changing a Tracheostomy Tube

Chapter 4 discusses the proper procedure for changing a tracheostomy tube, and the decisions involved in matching the appropriate tube to the individual patient, including when to use cuffed vs. uncuffed tubes, dual cannula vs. single cannula tubes, and when to use extended length tubes. A detailed appendix lists inner diameter, outer diameter, and length of adult, pediatric, and neonatal tubes.
Figure: Proper approach for insertion, caudal turn
©Linda L. Morris and M. Sherif Afifi. All rights reserved.
— Chapter 4 —
Fitting and Changing a Tracheostomy Tube
Chapter 4 discusses the proper procedure for changing a tracheostomy tube, and the decisions involved in matching the appropriate tube to the individual patient, including when to use cuffed vs. uncuffed tubes, dual cannula vs. single cannula tubes, and when to use extended length tubes. A detailed appendix lists inner diameter, outer diameter, and length of adult, pediatric, and neonatal tubes.
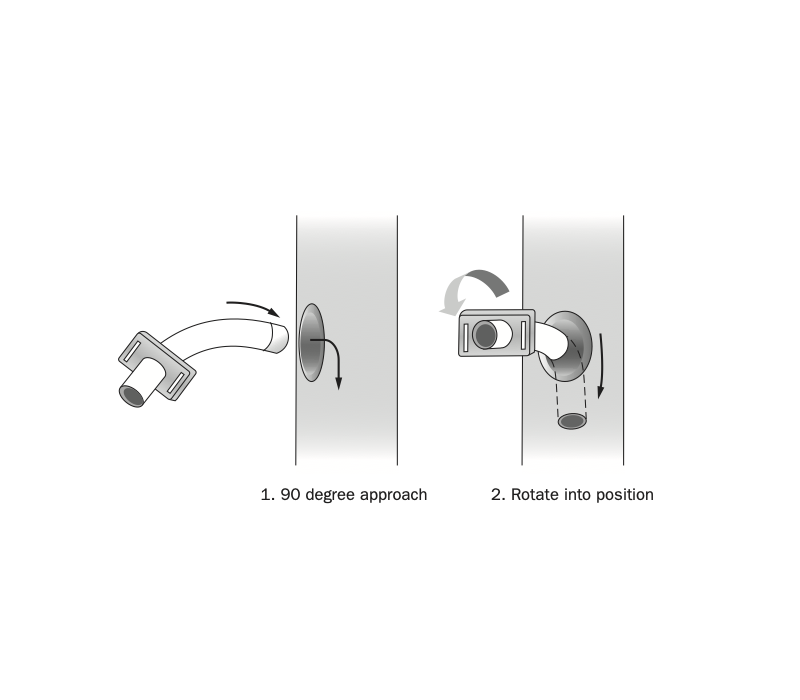 Figure: Proper approach for insertion, caudal turn.
©Linda L. Morris and M. Sherif Afifi. All rights reserved.
Chapter 5 — Addressing Complex Tracheostomy Issues: Mechanical Ventilation, Altitude, Wounds, Cuff Leaks, and Airborne Infections

Chapter 5 discusses numerous conditions that are encountered with the tracheostomy patient. Steps for management in different settings include the critically ill patient on mechanical ventilation, infectious airborne illness, cuff leaks, cuff changes with altitude and certain anesthetics, and complex wounds. A separate guided discussion about living with a tracheostomy is provided for patients and their caretakers.
Figure: Pistoning — Pistoning of tracheostomy tube against the tracheal wall. Note the cuff stays fixed in place. A) Tube at rest. B) Downward movement of tube with positive-pressure ventilation. C) Upward movement of tube with positive-pressure ventilation.
©Linda L. Morris and M. Sherif Afifi. All rights reserved.
— Chapter 5 —
Addressing Complex Tracheostomy Issues: Mechanical Ventilation, Altitude, Wounds, Cuff Leaks, and Airborne Infections
Chapter 5 discusses numerous conditions that are encountered with the tracheostomy patient. Steps for management in different settings include the critically ill patient on mechanical ventilation, infectious airborne illness, cuff leaks, cuff changes with altitude and certain anesthetics, and complex wounds. A separate guided discussion about living with a tracheostomy is provided for patients and their caretakers.
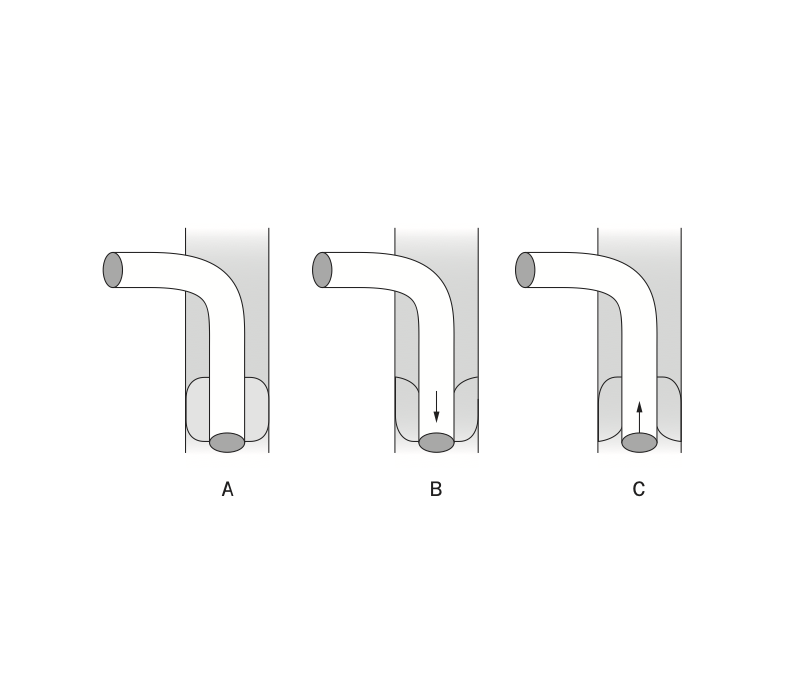 Figure: Pistoning — Pistoning of tracheostomy tube against the tracheal wall. Note the cuff stays fixed in place. A) Tube at rest. B) Downward movement of tube with positive-pressure ventilation. C) Upward movement of tube with positive-pressure ventilation.
©Linda L. Morris and M. Sherif Afifi. All rights reserved.
Chapter 6 — Phonation with a Tracheostomy

Chapter 6 explains considerations in achieving phonation for a patient with a tracheostomy. The methods to restore voice are discussed for patients on mechanical ventilation (continuous or intermittent), as well as for those who are spontaneously breathing.
Figure: Airflow with Blom Tracheostomy — Airflow with Blom tracheostomy tube on inspiration and expiration. As air is inspired through the tube, the flap valve (located at the distal tip of the tube) opens. The flexible bubble valve (located on the dorsal shaft of the tube) also expands, covering the fenestration in the outer canula. On exhalation, the flap valve closes, allowing airflow around it and collapsing the bubble valve to allow air through the fenestration and to the vocal cords.
*Reprinted with permission of Dr. Eric Blom. All rights reserved.
— Chapter 6 —
Phonation with a Tracheostomy
Chapter 6 explains considerations in achieving phonation for a patient with a tracheostomy. The methods to restore voice are discussed for patients on mechanical ventilation (continuous or intermittent), as well as for those who are spontaneously breathing.
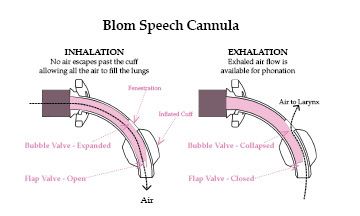 Figure: Airflow with Blom Tracheostomy — Airflow with Blom tracheostomy tube on inspiration and expiration. As air is inspired through the tube, the flap valve (located at the distal tip of the tube) opens. The flexible bubble valve (located on the dorsal shaft of the tube) also expands, covering the fenestration in the outer canula. On exhalation, the flap valve closes, allowing airflow around it and collapsing the bubble valve to allow air through the fenestration and to the vocal cords.
*Reprinted with permission of Dr. Eric Blom. All rights reserved.
Chapter 7 — Care of the Tracheostomy Patient

Chapter 7 details all care issues involved with a tracheostomy, including care of the stoma, management of secretions, mobility, nutrition, and patient teaching. Additionally, care of the tube and inner cannula, as well as other appliances, such as the T-tube and tracheal cannula are also discussed.
Photo: TRACOE Tracheostomy cleaning kit
Courtesy of TRACOE medical GmbH, Germany. All rights reserved.
— Chapter 7 —
Care of the Tracheostomy Patient
Chapter 7 details all care issues involved with a tracheostomy, including care of the stoma, management of secretions, mobility, nutrition, and patient teaching. Additionally, care of the tube and inner cannula, as well as other appliances, such as the T-tube and tracheal cannula are also discussed.
 Photo: TRACOE Tracheostomy cleaning kit
Courtesy of TRACOE medical GmbH, Germany. All rights reserved.
Chapter 8 — Special Considerations for the Child with a Tracheostomy

Chapter 8 addresses a host of issues in the pediatric patient with a tracheostomy. Considerations include timing, indications, and duration of placement of tracheostomy tubes, features of pediatric tubes, common complications, and the multidisciplinary approach to phonation, and growth and development issues.
Photo: Pediatric tracheostomy tube with Passy Muir speaking valve
— Chapter 8 —
Special Considerations for the Child with a Tracheostomy
Chapter 8 addresses a host of issues in the pediatric patient with a tracheostomy. Considerations include timing, indications, and duration of placement of tracheostomy tubes, features of pediatric tubes, common complications, and the multidisciplinary approach to phonation, and growth and development issues.
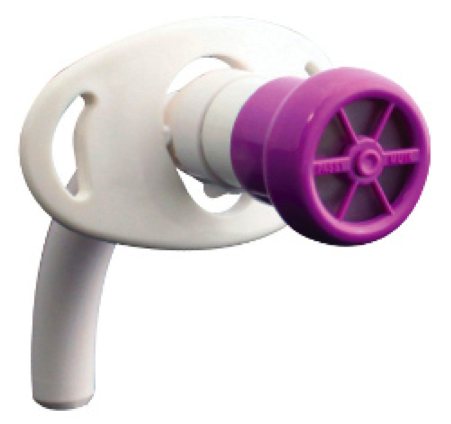 Photo: Pediatric tracheostomy tube with Passy Muir speaking valve.
Chapter 9 — Special Considerations for the Patient with a Laryngectomy
Chapter 9 surveys considerations for the patient with a laryngectomy. Differentiation between partial laryngectomy, hemilaryngectomy, and total laryngectomy is explained, along with implications for care and therapy. Patients’ psychosocial issues are also included.
Figure: Anatomy of the Pharynx and Larynx
©Linda L. Morris and M. Sherif Afifi. All rights reserved.
— Chapter 9 —
Special Considerations for the Patient with a Laryngectomy
Chapter 9 surveys considerations for the patient with a laryngectomy. Differentiation between partial laryngectomy, hemilaryngectomy, and total laryngectomy is explained, along with implications for care and therapy. Patients’ psychosocial issues are also included.
Figure: Anatomy of the Pharynx and Larynx
©Linda L. Morris and M. Sherif Afifi. All rights reserved.
Chapter 10 — Complications and Emergency Procedures

Chapter 10 discusses complications of the tracheostomy and how to manage emergencies during the intraoperative, early postoperative, as well as late postoperative periods. Step-by-step recognition and management of problems are detailed for malposition, displacement, false passage, mucous plugs, hemorrhage, stenosis, tracheomalacia, and many others.
Figure: Repair of tracheocutaneous fistula
©Linda L. Morris and M. Sherif Afifi. All rights reserved.
— Chapter 10 —
Complications and Emergency Procedures
Chapter 10 discusses complications of the tracheostomy and how to manage emergencies during the intraoperative, early postoperative, as well as late postoperative periods. Step-by-step recognition and management of problems are detailed for malposition, displacement, false passage, mucous plugs, hemorrhage, stenosis, tracheomalacia, and many others.
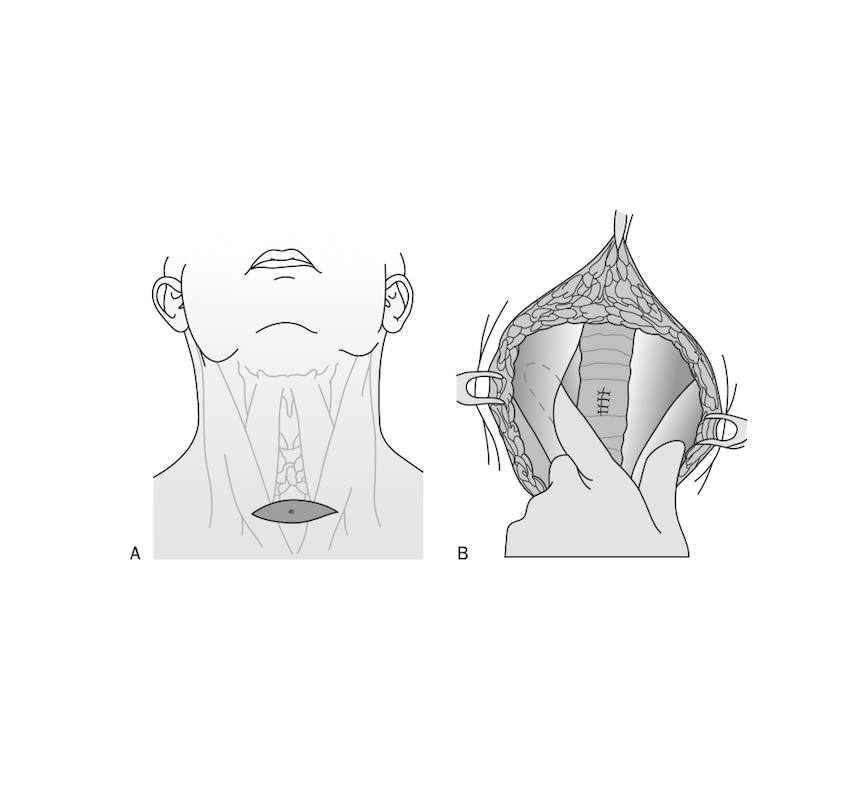 Figure: Repair of tracheocutaneous fistula
©Linda L. Morris and M. Sherif Afifi. All rights reserved.
Chapter 11 — Downsizing and Decannulation

Chapter 11 delineates downsizing—a gradual process of decreasing the size of the tracheostomy tube with the goal of complete decannulation. It describes a simplified process of downsizing, decannulation, along with tube choices and potential confounding events, such as increased airway pressures.
Figure: Airflow through a smaller tube compared to a larger one. Note less resistance with breathing through a larger tube. As the tube gets smaller, resistance (and hence, work of breathing) increases.
©Linda L. Morris and M. Sherif Afifi. All rights reserved.
— Chapter 11 —
Downsizing and Decannulation
Chapter 11 delineates downsizing—a gradual process of decreasing the size of the tracheostomy tube with the goal of complete decannulation. It describes a simplified process of downsizing, decannulation, along with tube choices and potential confounding events, such as increased airway pressures.
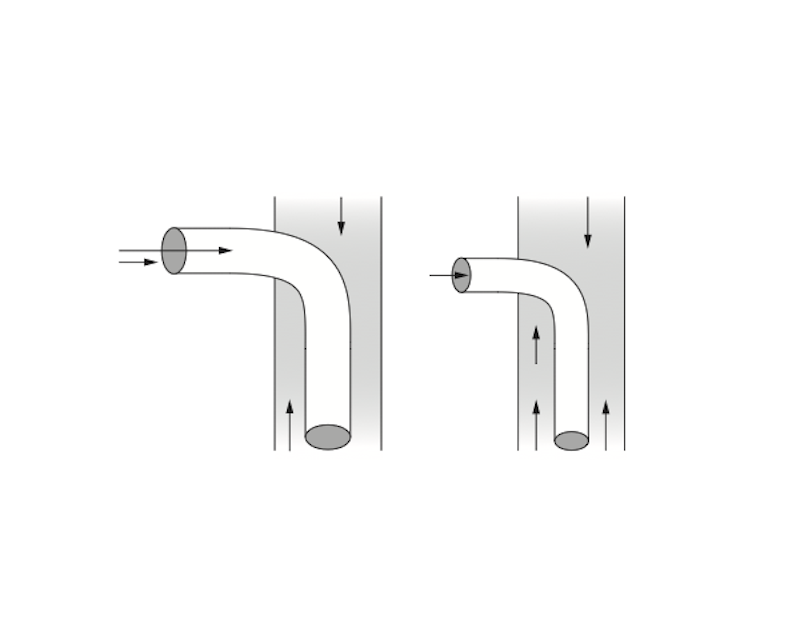 Figure: Airflow through a smaller tube compared to a larger one. Note less resistance with breathing through a larger tube. As the tube gets smaller, resistance (and hence, work of breathing) increases.
©Linda L. Morris and M. Sherif Afifi. All rights reserved.
Chapter 12 — Recovery & Rehabilitation

Chapter 12 maps out long-term care of the patient with a tracheostomy, traversing issues of recovery, rehabilitation, discharge planning, and home care. A systematic approach to follow-up in office or clinic visits is presented, and a special section is included to address psychosocial issues such as quality of life and caregiver burden.
Figure: Inflation and deflation characteristics of high-volume, low-pressure cuffs compared to low-volume, high-pressure cuffs. (A) During cuff inflation, high-volume, low-pressure cuffs distribute pressure over larger surface area. With low-volume, high-pressure cuffs, pressure is concentrated into a very small surface area. (B) During cuff deflation, the folds of the deflated high-volume, low-pressure cuff occupy a large surface area and create resistance to airflow around the outside of the tracheostomy tube. In contrast, the deflated low-volume, high-pressure cuff lies snugly along the shaft of the tube, creating no resistance to airflow around the outside of the tube.
©Linda L. Morris and M. Sherif Afifi. All rights reserved.
— Chapter 12 —
Recovery & Rehabilitation
Chapter 12 maps out long-term care of the patient with a tracheostomy, traversing issues of recovery, rehabilitation, discharge planning, and home care. A systematic approach to follow-up in office or clinic visits is presented, and a special section is included to address psychosocial issues such as quality of life and caregiver burden.
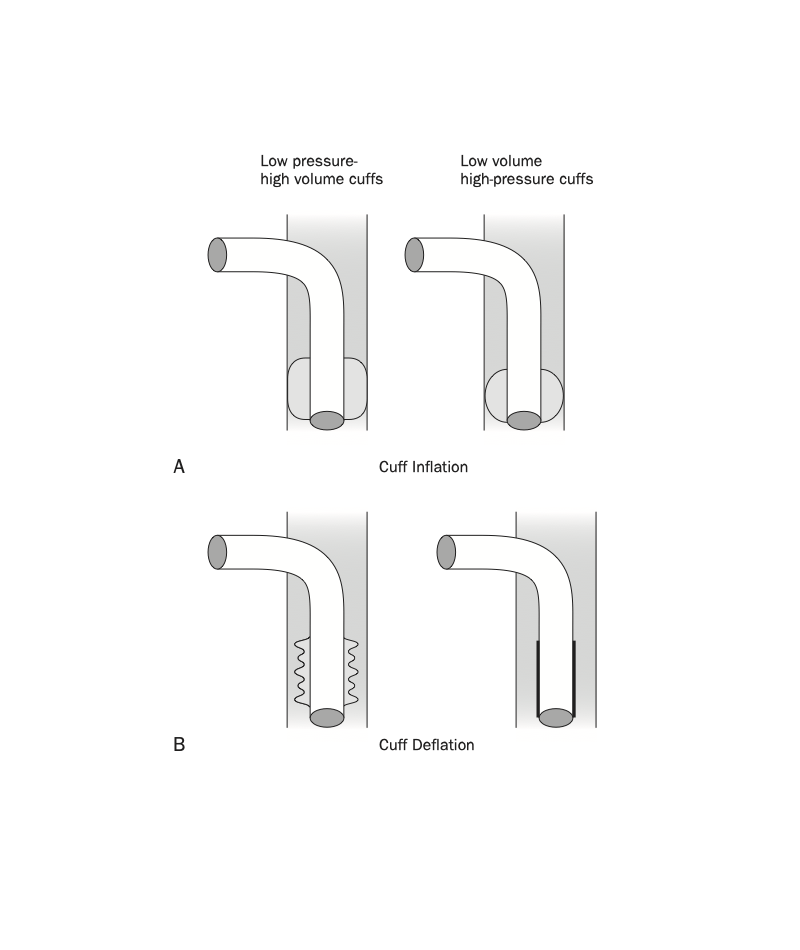 Figure: Inflation and deflation characteristics of high-volume, low-pressure cuffs compared to low-volume, high-pressure cuffs. (A) During cuff inflation, high-volume, low-pressure cuffs distribute pressure over larger surface area. With low-volume, high-pressure cuffs, pressure is concentrated into a very small surface area. (B) During cuff deflation, the folds of the deflated high-volume, low-pressure cuff occupy a large surface area and create resistance to airflow around the outside of the tracheostomy tube. In contrast, the deflated low-volume, high-pressure cuff lies snugly along the shaft of the tube, creating no resistance to airflow around the outside of the tube.
©Linda L. Morris and M. Sherif Afifi. All rights reserved.